Pro Tips for Better Gutting Your Deer


My grandfather was notorious for endingunsuccessful deer huntsby saying, “Well, at least we don’t have to gut a deer.” Looking back on that now, as much as I appreciated his silver-lining view on the matter, I realize that gutting a deer doesn’t have to be viewed as a dreaded chore.
Still, I know plenty of hunters who think of gutting a deer as a messy and intimidating task standing between them and a freezer full of delicious red meat. It shouldn’t be this way.
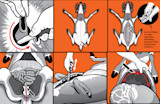
Rather than provide a step-by-step guide to gutting a deer, which you can find on the newMeatEater How To Gut A Deer Bandana, I want to share a few tips for making the gutting process faster, cleaner and less worrisome. And the first step in making the gutting process less painful is to ensure that you’re well prepared for the task.
Tony Peterson, an experienced whitetail hunter and outdoor writer, recommends you do this by always expecting success.
“Keep a quart Ziploc bag in your daypack with some wet wipes, gutting gloves, zip ties, and a razor sharp knife. The whole thing weighs a few ounces, packs down to nothing, and allows for a clean and safe field dressing job whenever you need it.”
When you actually start opening the deer, another small tweak on the traditional process that I’ve found helpful is to begin your cut near the sternum of the deer and work your way down, rather than beginning around the pelvis. This allows you to insert the knife into the chest cavity and begin your cut through the abdominal wall well before you’re anywhere near the stomach or intestines, where an errant poke of the knife might lead to meat souring stomach acids. Another widely known and important reminder is to use your fingers to push the stomach and other organs down away from the point of your knife as you open the cavity.
For avoiding contamination, Terry Drury, ofDrury Outdoors, recommends one more slightly customized tool to help with this job.
“Take a good pull saw and round-off the end of it on a grinder, along with about two inches of the teeth to dull them. You can now use this to cut the pelvis bone and sternum without running the risk of puncturing or grabbing anything that might contaminate the meat.”
By cutting the sternum all the way up towards the neck (on a deer you’re not shoulder mounting) it makes severing the esophagus much easier and will keep your arms and sleeves blood-free, too. Cutting fully through the pelvis makes the final step of removing the viscera an easy, one-pull process.
That is, assuming you follow the advice of MeatEater producer Janis Putelis for dealing with the diaphragm, which are the thin flaps of meat connecting the organs to the inside wall of the chest cavity.
“To make actually pulling the guts out happen in one fell swoop, take the extra time to cut the diaphragm all the way to the spine, prior to starting your pull. This will let everything release at once and you won’t have to stop halfway to finish cutting.”
If you’re still in need of more basic step-by-step instructions, be sure to pick up yourMeatEater How To Gut A Deer Bandana. With that tool and these quick tips in mind, your next field dressing should be so quick and clean that you’ll actually look forward to it.
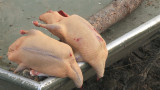
Feature image byCaptured Creative.
Shop
Sign In or Create a Free Account
Related
Whitetail
How to Gut a Deer

Butchering & Processing
Pro Tips for Better Gutting Your Deer