Backstraps from elk, deer, and antelope are some of the most prized wild game cuts . Their tenderness and shape yields excellent steaks, and every hunter should know how to properly handle them. Here’s how to get a juicy, perfectly seared venison steak every time.
Butterflies, Medallions, or Filets?
Everyone has their favorite way of turning a backstrap into steaks. But before you start breaking them down, take a moment to consider a couple of different options. The most common method is to cut the loin into medallions and butterfly them open. It’s nice that these pieces lay out wide, but they are easy to overcook if you’re not careful.
Another common (and the easiest) way to prep a backstrap is to cut it at 4- to 6-inch intervals. This cut is referred to as the chateaubriand on a beef tenderloin. I find it perfect for the forward portion of the loin where it’s much wider.
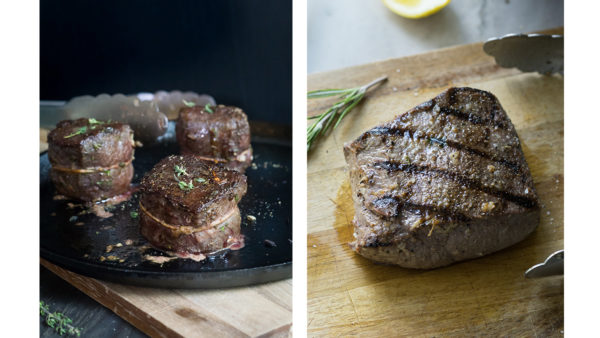
My favorite approach for the center and back portions of the backstrap is to cut it into individual filets, or tournedos if we’re getting technical. Do this by cutting the meat the same length as the width so they’re symmetrical in shape. Then, flip them over to the cut side and use twine to create a tall, round piece of meat. These cuts make for a beautiful presentation, and no one will complain if you substitute bacon for twine.

Season the Meat
Well-cared for venison has have a naturally robust, meaty flavor. You don’t really need to season backstraps with anything more than kosher salt and fresh cracked pepper.
Believe it or not, deciding when to salt a steak is a topic of much debate in the culinary world. I’ve conducted numerous experiments over the years and have found that salting meat in advance achieves the best results. In fact, I’ll season up to 48 hours ahead of time if I’m able to, but even just an hour in advance makes a big difference. If you failed to plan ahead or you’re just in a hurry, you can still add salt at the last minute, it just won’t be quite as good.
Pull meat from the refrigerator 30 minutes before cooking. Unless you happen to love a Pittsburgh-style steak with a charred outside and cold center, you want the meat to be at room temperature. Placing it in a hot pan while still cold will cause excessive steaming. Also, make sure to blot the steaks with a paper towel before searing to ensure a crispy, brown crust.
Sear in a Hot Skillet
When you’re ready to cook, heat a large cast iron or stainless steel skillet over medium-high heat. Add enough oil to coat the bottom of the pan lightly, and choose an oil with a neutral taste and high smoking point. My preferences are avocado, grapeseed, or canola.
When the pan is hot (almost smoking) lay the steaks down, leaving a bit of space in between them. Sear the backstrap until a dark crust forms and the meat stops sticking to the pan, about 2 to 4 minutes, and then flip. If you are cooking an elk or moose backstrap, you might need to transfer the skillet into a preheated oven to finish. Otherwise, adjust the temperature so that the outside doesn’t burn before the inside is cooked through.
Butter Basting
About halfway through cooking, or after you’ve flipped the steak, you can drop in two tablespoons butter to add fat and flavor to the venison. Try incorporating a couple smashed cloves of garlic and a few fresh sprigs of rosemary or thyme. When the butter bubbles, tilt the pan over so that the liquids pool to one side. Use a spoon to scoop up the melted butter, then pour it over the meat. Repeat this process several times to butter-baste the venison.
This step is entirely optional; choosing whether or not to butter-baste a steak should depend on how you plan to serve it. For example, meat-flavored browned butter is my favorite topping for mashed potatoes. It’s an effortless way to add fat to an otherwise lean cut, and some extra flavor without creating an elaborate pan sauce.
Testing for Doneness
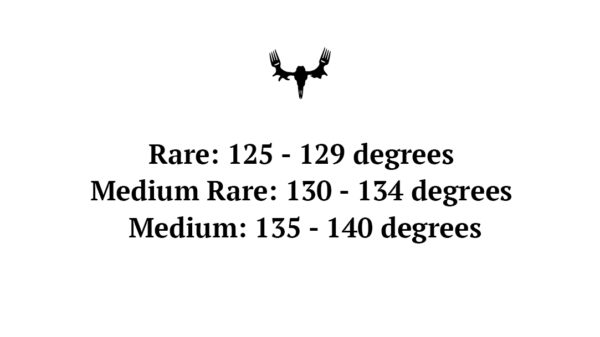
There are two ways to check the doneness of your steaks. I highly recommend using a meat thermometer. Meat continues to cook even after it’s removed from heat, so you’ll want to pull the steak a couple of degrees in advance of the desired final temperature. This is referred to carry-over heat.
The second way to test doneness is the finger test. This offers a rough estimate but is anything but exact or scientific. With your hand relaxed, feel the firmness of your palm at the base of your big thumb. This soft, fleshy area resembles how a raw steak should feel. If you press your thumb and index finger together, the muscle will tighten and feel like a rare steak. The thumb and middle finger will feel like a medium-rare steak, the thumb and ring finger like a medium steak, and the thumb and pinky like a well-done steak.
Knowing what this feels like, use tongs or your finger to press into the meat to judge doneness. If it feels like thumb/pinky, you’ve messed up.
If you want to treat your meat with the care it deserves, just use a thermometer.
Resting
Everyone has been lectured why it’s crucial to let meat rest, but in case it hasn’t sank in for you yet, I’ll reiterate why this is important. Moisture squeezes out from muscle fibers as meat heats up. Resting steaks after cooking will give the meat a chance to slightly relax, and allow those juices to flow back inside the fibers.
In other words, steaks that are cut immediately after cooking will have flavorful juices flowing out upon each slice. If you can patiently wait 5 to 10 minutes, you’ll enjoy a juicer, more flavorful steak.
When resting, do not tent with foil. It traps the heat in, raising the internal temp and creating steam. If you sear the steak as described above, you’ll want to enjoy that delicious brown crust you created.
You can serve a juicy steak with a side of bordelaise, or keep it plain and savor the flavor of your wild game. No matter how you serve it, I promise these directions will yield consistent, delicious venison steaks.


