Ice fishing always feels a bit like a scavenger hunt. You can’t see what’s swimming in the water beneath your feet and unless you’re fishing with electronics or are fishing an area you know extremely well, having a successful day usually comes down to finding clues. It’s a game of seeking and searching where you ply and prospect like a miner panning for gold in hopes of finding the mother lode.
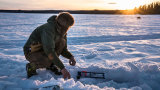
Now, just because you’re constantly on the hunt when you’re ice fishing, it doesn’t mean you’re fishing blind. There are a ton of different tools that can help you find and stay on top of fish and perhaps most useful among these is the tip-up.
These fantastic little inventions, which can be baited and set with a small flag that will spring up when you get a strike, are a great tool for helping you find and catch more fish. All you have to do is set several of them in good spots and then leave them to produce. However, if you want the most bang for your buck, you can’t just set up your tip-ups haphazardly. If you want to catch more fish on tip-ups, you’ve got to use some strategy.
Know Your Water
Before you set a single tip-up or drill a single hole, you’ve got to learn a bit about the water you’re fishing so you can make a battle plan. Just like when you’re finding a good spot for a tree stand or setting traps for beaver, a little bit of pre-scouting goes a long way, and the best way to start doing that is with a good map. A bathymetric map or mapping app will show you the depth changes, underwater structure, and the shallow flats where fish move and feed, giving you insights on where and how to plant your flags.
Electronics can also be an incredible tool when fishing with tip-ups. With either underwater cameras or even modern sonar, you can inspect the water below the ice after drilling your holes and find both underwater structures and fish. Finally, you should do a bit of research on what species are available in the waterbody you are fishing so you’ll know what baits to use and how and where to set up your tip-ups for the best results.
Shallow to Deep
Setting your tip-ups in a shallow-to-deep formation is a simple and fantastic way to target shallow-to-deep-running species like lake trout, white perch, burbot, and walleye. It’s also a great setup for fishing long points of shallow water surrounded by sharp drop-offs or for fishing gradual slopes of deepening water that leads out to long troughs or drop-offs.
To set it up, you’ll want to first drill a hole at the shallowest fishable point—usually between three and five feet—and then, in as straight a line as possible, drill holes out to deeper water. Space the holes out at whatever distance is necessary so that you can set each tip-up at descending depths with each being between 12 and 24 inches deeper than the last.
This will give you a good range to start. Once you start catching a couple of fish and get a good idea of where the fish are moving, or if aren’t catching anything at all, you can gradually move the entire line forward out to deeper and deeper water.
The 3-2-3
The 3-2-3 setup is a great way to fish tip-ups when you’re fishing an area with multiple types of underwater structure such as weed beds and rockpiles, sandy and muddy bottoms, or when multiple depths are likely to hold fish. It’s also a great way to target multiple species at once, such as when you’re fishing for both panfish and bass, perch and walleye, or even multiple species of trout. It’s also a setup designed so that you can fish with multiple bait sizes and types in different areas so you can prospect a bit and see what’s biting.
While it’s called the 3-2-3, the setup isn’t just designed for 8 tip-ups exclusively, as most states and waterbodies only allow for a limited amount of lines, usually between three and six per person. Of course, the 8-line setup can be pulled off with a fishing buddy, but even if you only have three or four tip-ups or if you’re fishing in an area with a more liberal limit where you can fish 10 or more lines at once, the idea behind the set-up remains the same.
Generally, a 3-2-3 setup is designed so that you have the bulk of your tip-ups set up in what you perceive as the most productive areas, and a couple of prospecting lines set up in different areas and/or with different baits.
To start, drill three holes over what you perceive to be your most productive area, keeping them in roughly the same depth and over the top of the same types of structure (weed beds, rockpiles etc.) Next, drill two holes at the outer fringes of the same area, either where the depth dramatically changes or over a different type of bottom. Finally, drill a further three holes in an adjacent area with a similar depth and bottom structure.
Until you know you’re in the right spot, it’s important to start fishing with the same baits on every line, including your fringe lines. By setting all your lines with the same minnows, worms, or other bait, any quick flags on the fringe lines will let you know that your judgment may have been a bit off and allow you to quickly move the bulk of your tip-ups to a more productive area. Once you’ve rearranged your set up, you can then set up your fringe lines in a new area and start experimenting with different bait sizes and types.
Spread The Edge
Spreading your tip-ups along the edge of a drop-off is a fantastic way to target larger, more predatory species. Fish like pike, muskie, and big lake trout are constantly moving from deeper water into the shallows to hunt and by setting your tip-ups strategically along the edge of a drop-off, you can capitalize on this behavior. As you never really know where or when one of these large predators is going to glide into shallow water or what they’re going to be feeding on, this setup helps you increase your odds of running into one. Additionally, it also allows you to alternate both bait types and sizes to see what the fish are hunting for.
Your map or mapping app can really be helpful when fishing with this setup, as it allows you to easily identify dramatic depth changes by identifying underwater contour lines. In a spread-the-edge setup, you’ll want to line your tip-ups along the outer edge of one of these lines. Ideally, you’ll isolate a contour line about 50 yards from shore where a sharp slope separates 10 to 20 feet of water from 6 to 7 feet or less.
After you’ve found a good spot, drill your first hole so that you can position a tip-up on the furthest outside bend of the contour line. This should be your furthest hole and your starting point. Once it’s made, you can then drill alternate holes on either side of it, about 30 feet apart, so that you’re following the edges of the contour back in towards shore.
Set your other tip-ups in these holes, alternating between large and small, live and dead baits, until you’ve got most of the drop-off edge covered. Once you start getting consistent strikes on one side of the line or the other, you can then move your tip-ups and change your baits so that your spread is along the most productive edge of the drop-off with the most productive baits.
Raise the Flag
Tip-up fishing is easily one of the most thrilling ice fishing techniques. Each time a flag springs in the air, you sprint towards the fluttering banner, full of anticipation about what could be on the other end. It adds an element of mystery and excitement to what can often be a dull day sitting in the cold, and it’s a fantastic way to probe and explore a new body of water.
Tip-up fishing can easily be your most productive ice fishing method, but fair warning, it can also be exhausting. It’s not a game for anglers who like to sit in one spot and jig all day long or for when you’re in the mood to snuggle up in a cozy ice shanty. But when you put the right tip-up spread in the right place, you can strike it rich and end up chasing flags and catching fish all day long.
Shop
Sign In or Create a Free Account
Related
Ice Fishing
Video: How to Set an Ice Fishing Tip-Up


Ice Fishing
How to Target Multiple Species Through the Ice